2008-11-20

You pushed me over and I; Keep falling, keep, keep falling the cliff.


I am not sure that we are even half-way through this crisis. Keep falling, keep, keep falling the cliff..

One thought though: why 'Subprime Mortgage Crisis'? While subprimers made the initial appearance, it seemed people using their house as ATM had the larger role.

Adjusting my gas furnace

Disclaimer: tinkering with gas is dangerous. Below are steps I took to adjust my gas furnace for my own documentation purpose. I decided to share it to public for educational purpose. If you blow up as a result of reading this article, you are on your own.


This is my gas furnace. Manufactured in March 1990. It is 18 years old now. Its efficiency rating is output_btu_per_hour / input_btu_per_hour = 56K BTU/70.5K BTU = 79%. Modern gas furnaces reportedly have 90% or better efficiency. But mine still works and winter in northern virginia is quite mild. I see no reason to replace it yet.

It's been cycling in short interval and I wanted to see if I could do something about that.

The first thing I checked was the flame colour. It should be blue. Orange flame indicates insufficient oxygen or some contaminations. If there is not enough oxygen, the flame will produce soot.

To adjust oxygen level, adjust the air stuter (picture below):


The furnace was a forced air model. The flame heats a heat exchanger which quite similar to a radiator. A blower blows cold air through the exchanger. This heats the air before it comes out of the exhaust register. Adjusting this gas furnace involves balancing the heat put out by the furnace with the cooling the blower provides.

In my case, although the spec says that my furnace could generate at 56K BTU/hour, the blower was not powerful enough to cool the exchanger. My house had 3 intake registers, one on each floor. The ductings was not large enough to reduce the air flow resistance to my blower's capability. If I openned up the blower panel, the blower managed to push enough air to cool the furnace at full power. But obviously I could not run it like that for daily usage.

Adjusting the power of my furnace was done by adjusting the gas flow. Here's my final setting at 3/4 of full flow:

To get at the setting I let the furnace operate as usual while watching the fan limit control switch. I set mine to 100F,140F,200F. I've seen some set at 90F,140F,190F, or 90F,110F,190F. The spec says that the max air outlet temperature is 170F. So, my goal was to get the heat exchanger temp steady at around 170F.

I let the furnace run as normal. I reduced the gas flow if the temperature goes up to the OFF setting (200F) or increased the flow if it held steady at less than 170F. I was gentle when adjusting the flow; a small nudge may be all that's needed.


After about 1/2 hour of tweaking, I managed to have it hold steady at around 170F. It kept at that temperature until the thermostat tells the furnace to shut down. Cycling problem solved. Cost to do that: 2 hours research, 1/2 hour of staring at the control switch.


2008-11-14

I finally found the culprit

One month ago, my wife's car had a dead cylinder. It was cylinder #3. It passed all the usual tests: spark plug sparking, compression test showed 170psi across all cylinders, fuel injector ticking, presence of fuel injector signal. But it just didn't want to start.

Peering down the cylinder hole, I noticed a pool of oil on top of the piston. A leaking valve stem seal could put too much oil into they cylinder and foiled the proper mixture for combustion. So I replaced them and cylinder #3 was still dead.

I then wanted to double check the compression test figures. It showed 170psi for all cylinders. That was a good figure, but it measured only the peak compression and did not show there was enough compression at the right time. So I bought Harbor Freight Tool's leak down cylinder tester for $30.
   

But they showed minimal leakage.

I was desperate by this time. I decided to take a look at the fuel injector. Two years ago I replaced fuel injector for cylinder #3 because it went bad. So I was very doubtful that the fuel injector could go bad again within just 2 years. But I was desperate. 

Just for the record, it's possible to remove the fuel injector harness (fuel rail) without removing the intake plenum. You need to remove the bracket that secures the accelerator cable though. The bracket is secured by 1 bolt on the cylinder head and 2 studs on the intake plenum. Remove the bolt and twist open the studs with vice grips. Doing so will damage the studs. I replaced the studs with bolts. Good riddance since I hate dealing with studs in general. 

That's when I found the culprit. Compare cylinder 1 and 3's fuel injectors:


No wonder cylinder #3 was dead. The bad o-ring must had been leaking fuel into the cylinder.
It seemed that the replacement pintle cap I used was too wide. When securing the fuel injector into the harness, the smaller opening on the harness pushed the cap against the o-ring.

Fortunately I had spare pintle caps. It was a good thing I didn't cheapen out two years ago by ordering more than I needed. I trimmed the rim of one and installed it.

That's all it took to bring the cylinder operational again.

Installing and removing recessed valve keepers

Nissan Sentra GA16DE, as is the case with many other Japanese engines, have recessed valve. As such, a common valve spring compressor design like the one below won't work.


One tool that can work (or rather be made to work) with recessed valves is Leslie 36200.


To install the valve keepers, use it without the black attachment. Just position it on top of the valve keepers and push down. It has a strong magnet at the end so as you push down the valve spring retainer,  the magnet will capture the keepers. 


A valve spring retainer and valve keepers.


But as it was, its diameter was too big for the valve cylinder. So it needed to be filed. I didn't have a grinder so  it took me 3 hours while watching Pink Panther to file it down. Oh good times.


The yellow zip tie represented my target diameter. It was set to a slightly smaller diameter than the valve cylinder's.


I pushed the zip tie as far down as possible and marked places that were still thick.


1.5" was deep enough for GA16DE.

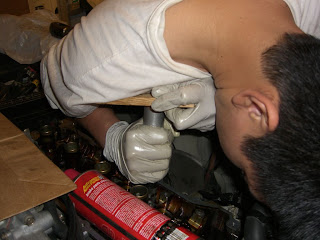
I don't have a picture of using it to remove the valve keepers, but here's one of me using the installation attachment. Just assemble the valve spring, retainer and keeper, and push down with the tool. Note that I was posing for the picture because I didn't take some while I was doing the actual installation. In a real installation picture, you should see an air compressor hose going into the cylinder or a string of nylon rope to float the valves up.


If you do not have enough power to push down the tool with your hand (awkward position, short stature, etc.), you can try pushing down the tool with your body weight as pictured above. Use a piece of wood to spread the pressure and push down. This works for the intake valves too which are positioned further inside the engine and may not allow you to push down effectively.

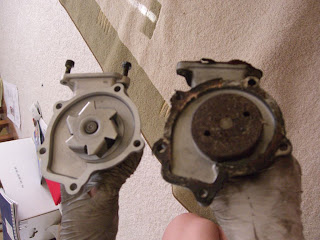
Water pump old vs new

From 1994 Sentra GA16DE 1.6L:


new vs old water pump. The old one had been on the car for 5 years and was leaking.